
People form their first impression of your website in about 50 milliseconds (that’s 0.05 seconds). Not even a whole “one-Mississippi” and a user has already determined if they will stay or leave. So what’s a make-it-or-break-it element for grabbing your user’s attention? Professional, optimized website photos.
According to the HTTP Archive’s State of the Web report, images make up more than half of a page’s weight on average. However, when appropriately optimized, pictures don’t have to take a significant toll on your site’s load time.
Don’t worry. You don’t have to be a professional or a Photoshop wiz to make your images both polished and optimized. Keep reading to learn more about what you need to know when selecting and editing images for your site.
Editing your website photos
Quality is everything
When asked, 67% of people said the quality of a site’s photos was “very important” when choosing and buying products or services. High-quality images and pictures that provide value and context to website content. They also can help boost the overall experience of using your website.
While everyone’s budget doesn’t allow for a professional photo shoot for their website, you’re always welcome to take your own or invest in quality stock images.
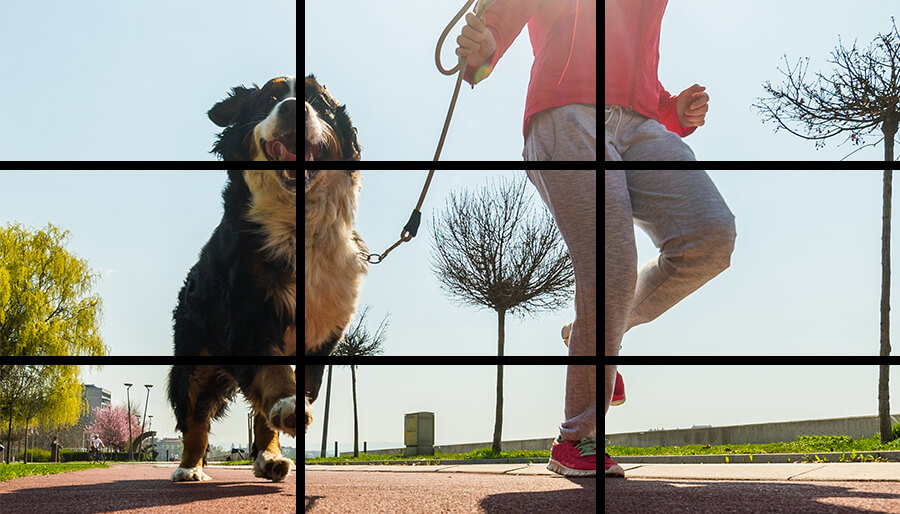
Follow the rule of thirds

The rule of thirds is a guideline for photo composition. Suppose you divide a picture evenly into thirds horizontally and vertically (envision a tic-tac-toe board on top of your image). In that case, you want to frame the image’s subject placed at one of the intersections.
Not having an extensive photography background doesn’t have to stop you from getting the most out of your website images. You can follow this simple photo composition rule when cropping even poor photos to make them more interesting.
By following good photo composition practices, you can help guide your visitors’ eyes through the photo, thus increasing the image’s impact.
While there are always exceptions, following the rule of thirds is a simple way to boost any website photo’s appeal.
Choose the correct file type for your website photo
All of the different image formats can be overwhelming, but knowing the difference and how each file type works can help you make the best choices for your website pictures and not compromise image quality. Two of the most common image formats used on the web that you should be familiar with are PNG and JPG.
PNGs
This file type generally works better for crisp images with limited colors, such as icons or images with text or logo overlays. PNGs also support the use of transparent backgrounds. Since PNGs support “lossless” compression, these files will contain more information than a JPG file, but be careful. While PNGs produce a high-quality image, they can have a much larger file size depending on image content.
Pro-tip: Use PNGs sparingly, reserving them for graphical elements and images that require high resolution.
JPGs
JPGs are typically the go-to when it comes to saving out website photos. This file type works well for images with lots of colors, and their smaller file size makes them load faster for users. However, keep in mind that JPG is a “lossy” file type, which means that the quality may decrease when compressed. This can be especially noticeable on photos with text overlays or logos. In those cases, you’ll get more professional results with PNG files.
No matter which file format you choose, be sure to compress images before uploading them to your website’s server.
Naming, captions, and alternative text
What is alternative text? Alternative text, or alt text, is an attribution added to a website image that describes what’s shown in the picture.
While it may not seem like the name of your file, the caption, or the alternative text should be top of mind, they are all significant opportunities to improve your website photos.
It can be tempting to quickly use the default file name like DSC_09201.png, but it’s essential to give each photo and graphic file a name corresponding to the image’s content. So next time, try something more helpful like SEO-information-chart-illustration-banner.png.
Providing captions when possible and including helpful and descriptive alternative text not only helps your engagement but is excellent for your website in terms of accessibility. Plus, the name of your images can help them rank better in Google image search AND can help give search engines more content when scanning your site (woo-hoo for boosting your SEO).
Pro-tip: Use hyphens or underscores instead of spaces to separate the words in your file names to help your files load correctly on your site. Additionally, avoid characters like question marks, percent signs, and ampersands.
Image dimensions
Adding photos to your content is great, but take time to correctly edit your images and resize them to the proper dimensions for your website design.
If you’re using a content management system that lets you place images within an editor, be aware that visually adjusting the dimensions is not likely to truly resize an image file. Instead, resize your images before uploading them to your website to ensure better load times.
Pro-tip: Check with your web design agency or your website developer for any image size recommendations. Then, edit your website photos accordingly before adding to the content.
Image optimization tips and tricks
What is image optimization anyway? Image optimization is a step during the website production process where you reduce the file size of your images to get them as small as possible—without sacrificing too much quality. Smaller image file sizes help keep your website page load time low.
It’s a scary fact that 40% of people will leave a website that takes more than 3 seconds to load, and website photos play a significant role in this number; the larger your file sizes, the longer it will take your site to load. Don’t let your photos be the reason a user visits and immediately clicks away because of poor performance.
Saving images for the web with Photoshop
Reducing the file size of website graphics without reducing the quality is vital. An excellent method for reducing file size is using Photoshop’s “Save for Web” function. This will help you strip the unnecessary metadata and get you a smaller file size for your graphics.
When you open your image in Photoshop, simply navigate to File > Export > Save for Web (Legacy). From there, you’ll be able to choose your export quality and be on your way to reducing file sizes without sacrificing the quality of your images in no time.
Exporting images with photoshop is easy, but remembering the nitty-gritty details can be tricky. So we’ve broken down the exporting settings below so you can use the tips as a website photo prep checklist:
- Quality: This is in the top, right-hand corner (TBH Creative uses 72dpi)
- File format: As we talked about above, picking the suitable file format will save you tons when it comes to the size of your images (JPGs will get you the most bang for your buck when it comes to quality and size)
- Optimization: Be sure to check this box in the top, right-hand corner
- Expected file size: In the bottom left-hand corner, you’ll see the expected file size
Compressing website photos
Using Photoshop to resize your original, hi-res photo is the first step when reducing the size of your images. Going further and compressing your images is a must to shave off another 5-10% of your graphic’s size. Learn more about measuring site speed and why it matters.
Once you have your final image with the correct dimensions and file type, there’s one more step to take before uploading your image to your website: compression.
By compressing your images, you’ll be able to reduce your file size without sacrificing any noticeable image quality. All you need to get started is an image compression tool. Some of our favorites include:
- TinyPNG: The best free browser tool for compressing up to 10 PNG and JPG images at a time
- ImageOptim: A great free app for compressing images that works great with macOS systems
- JPEGmini: Another helpful app for compressing with both Mac and Windows computers
By now, we hope you have a better understanding of editing and optimizing your website photos. While it’s helpful to have images on your site to build your brand, boost your SEO, and provide a great user experience … don’t sacrifice the quality of your website or photos.
Implement the tips above and get ready to see results on your site. Just don’t forget to optimize, optimize, optimize!